Author: Bhorak

How to Draw a Duck

Drawing a duck can be real fun. The lovely, cute, small creatures have always captivated the attention of small children. Be it in the form of images in storybooks and cartoon series or in the form of rubber toys; the little duckling never fails to charm kids. If your child shows interest in drawing, then duck sketching can be the best start for him/her. Here are some instructions that will guide your child to draw a duck. So, get started.

Duck Drawing

Instructions

  1. Draw a small circle for the head of your ducky. It need not be a perfect circle but try to keep it neat.
  2. Just below the circle, make an oval shape with a pointed end towards the left. This oval will be the body of the creature. The pointy side will become the tail of the duckling.
  3. Now connect the head with the body by drawing two small curved lines on both sides of the head. These connecting lines emerging from the left and right of the head should merge with the outlines of the body oval.
  4. Broaden the chest of the duck for a finer look. For this, all you need to do is extend the neckline falling on the right side, curve it a little in the middle and then finally merge it with the body outline at the base.
  5. Make a small circle in the head portion for the eyes. Also, add a beak to your cute duck. For creating the beak, first draw a ‘U’ shape such that its open side is facing towards the right. Within this U, make a slightly curvy V and then attach the ends of both the letters together.
  6. Go on to make the wings of the creature. For this, draw a half oval within the body such that the left side (open side) is broader than the right side. Now add feathers to the open side of this oval. Small curvy lines resembling ‘U’ or ‘V’ shapes will serve the purpose.
  7. If you want, you can also add feet to the duckling or else simply add water waves to depict your duck swimming in water.
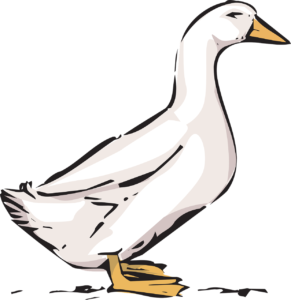
  8. Your drawing is complete. However, without colors, your picture may just be lacking the perfect look. So, go on to add bright colors to your sketch. Use yellow for the duck, red for the beak, and black for the eyes. Also, make sure to make the wing feathers bold by using black.

Tips:

  1. Make a light pencil sketch first. When satisfied with the look, go on to darken the outlines.
  2. Erase the intersecting or overlapping lines (like the line that falls between the body and the neck).
Share Button

How to Draw an Eagle

Have you ever observed the majestic beauty of an eagle? Flying high in the sky, these birds are heavy-beaked and big-footed creatures that are said to be very powerful. Known for their great strength and excellent eyesight, they are awe-inspiring beings that can be fun to draw.

Eagle Drawing

If you are captivated by the regal charm of the bird, then capture it in your canvass. This article will help you draw an eagle through step-by-step instructions. Follow the instructions carefully and make a perfect piece:

Instructions

We will start with simple basic shapes and then add details to the shapes for the finishing touch.

  1. First, draw an oval shape for the body of the eagle.
  2. Next, add the tail. For this, first, draw two straight lines from the end portion of the body and then join the two lines by a rough curve. The lines should be slanting a bit away from one another.
  3.  Draw the head and neck portion of the bird. For this, you can use a half oval shape. Ensure the broader part of the oval forms the neck and the narrower makes the eagle’s head. Add a beak to the head by drawing a shape resembling ‘<‘. The brim should be pointed at the edge so as to have a hook-like effect.
  4. Add wings to the body by making two boxy flaps. You can initially make rectangles for the wings. Later, add desired curves and fringes as and where required. Make these wings balanced with the body to add realism and perspective to your sketch.
  5. Now add two lines (a bit curved) descending from the bottom of the body. These will become the eagle’s legs. At the edge of these lines, draw the claws of the bird’s foot.
  6. Add the evil glaring eyes. Shape them up for a finer look. The basic structure of the bird is ready. Now add extra details to make it more realistic.
  7. Give finishing touches to the sketch, like add feathers and sharpness to the nails. All these details will make your drawing more delicate.

Your drawing is complete. See how awesome your eagle looks!

Share Button

How to Draw a Fairy

Fairies are beautiful imaginary creatures that have captured the fancy of children. Since they are mythical beings and exist only in imagination, it is difficult to define them with exact shapes and sizes. Hence, there is no specific answer to how to draw a fairy. However, as they are figments of one’s imagination, one can give shapes of their fancy to these wonderful beings while drawing them. That is probably the reason it is not difficult for anyone to draw a fairy. As myths and old legends describe several types of fairies, you can pick any of the types to prove your imaginative skills on paper. There are some basic steps of drawing fairies. You just need to use the idea for preparing the frame; the rest of the part is up to your creativity.

Drawn fairy
  • The first step of drawing a fairy is to draw the basic body structure. Generally, it is assumed the fairies have the shapes of general human beings but with wings. Hence, drawing the body part of a fairy is quite similar to drawing a human. So, to get started with, draw a pear-shaped structure to draw the head and make segments to draw other parts of the face later on. Ensure that the head of the fairy is placed in a location on the paper, that leaves adequate space for the rest of the body.
  • Now draw the other parts of the body such as neck, chest, tummy, arms, hands, elbows, fingers, hips thighs, knees, legs, feet, etc. Draw oval shapes consecutively for each of the body parts. However, you should keep in mind that each oval shape should be of different sizes depending on its ratio to the size of the entire body. For instance, the oval shape meant for the chest or hips is relatively bigger than the shapes drawn for elbows and fingers.
  • Before drawing hands and legs you need to think about the exact shape that you are going to give to that drawing. The position of hands and legs gives an idea about what the fairy is doing. In most of the myths, the fairies are flying creatures. Also, many children love to draw the fairies in flying positions. So while drawing the fairy, if you can manage to draw the posture of the figure leaning forward and the feet pointing down you can create an impression that the fairy is flying. Often, the fairies are also found in sitting positions. In such cases, you don’t need to draw the entire legs. Rather, you can draw the petals of a flower to make the fairy appear as if sitting inside a flower.
  • Once the basic structure of the fairy is over, it’s time to draw the details. As the face of the pear shape is segmented, draw the eyes, nose, and lips carefully with light strokes of a pencil. Erase the extra lines as soon as possible. Gradually, draw the other details of the body such as dress, shoes, and hair. Fairies are generally found with beautifully designed dresses, pretty similar to prom dresses. However, you can draw your fairy with any type of clothing you like.
  • The most essential part of a fairy is its wings. Draw the wings from the back of the fairy’s body and make it spread wide apart if your fairy is facing you. If you give a side view of the fairy let the wings close toward the back.
  • Finish the drawing by adding colors to the fairy. You can also add accessories to the fairy. Or else, draw the surroundings to give it a better look.
Share Button

How to Draw a Realistic Face

Drawing a face that looks real and lifelike is a bit difficult and requires a lot of practice. For being able to draw a realistic face perfectly, one has to study and understand the anatomy of the face in particular. Observing the position wherein each feature of the face is placed is important while drawing a realistic face. Although drawing a realistic face is a bit of a challenge for an amateur but with gradual practice and by following certain basic guidelines, one can master the art of it perfectly. This article will be dealing with the steps that are involved in drawing a face that looks real and lifelike. Have a look at the step by step guide given below that can help you in the task further:

Face drawing
  • First of all, start with the shape of the face. Take paper and a pencil and draw out the shape of the face that you wish to create. Before doing so, you have to decide whether the shape should be oval, square, or round. After having decided on the shape, you can draw it out on paper.
  • The next step is dividing this face into sections. This can be done by drawing a vertical line across the center of the face and a horizontal line across the center of the face. You shall also have to divide the upper and the lower half of the face by drawing out two more horizontal lines.
  • Now we shall draw the eyes in the face. The most common misconception that people have while drawing eyes is that they place them at the top whereas eyes are more towards the center of the head. Take your pencil and by using it you have to draw five equal-sized eye shapes that are positioned across the centerline of the face. Remember that these eye shapes should resemble a fish without a tail. After drawing the shapes, you have to erase the eye in the middle and the ones that are furthest on each side. This will give you your eyes that are perfectly placed in the correct position on the face. You can then proceed on to draw the iris and pupils of the eyes that you have drawn.
  • Now we will focus our attention on drawing the nose on the face. Remember that the nose is positioned in the center of the face on the line just beneath the eyes. Start drawing a vertical line from the inside of the irises to the nose line. This will help you in determining the width of the nose that you are about to draw on the face. A wide nose should touch these two lines, whereas an average nose should be much thinner.
  • Now we shall draw the mouth. You have to keep in mind that the mouth is positioned halfway between the nose and the chin. As we did for the nose, similarly for determining the width of the mouth we have to draw a vertical line down the face from the pupils of the eyes. Make sure that the corners of the mouth touch these lines that you have just drawn for determination of the width of the mouth on the face.
  • Now we need to draw the hair, ears, and eyebrows of the realistic face that we are making. Make sure that the ears should start at the eye line and end at the nose line. The hairline should start at the line that is positioned above the eye line. From this particular line to the top of the head, you have to draw the hair.
Share Button

How to Draw a Mouth

The mouth is an important part of the face, and with full shiny lips, it can leave anyone wowed. It is not surprising that drawing a mouth with complete expression is also tricky, as it can literally make or mar the appearance of a face while drawing it. But if you learn the tricks of how to draw a mouth, you can add numerous expressive impacts to a face.

Mouth drawing
  • To draw a mouth effectively, you first need to understand the lip structure – the slants and shadow of the upper lip, projection of the lower lip. The lower lip is generally thicker than the upper lip and hence catches more light. If you notice other paintings you can observe a shadow under the middle thick area of the lower lip. It adds to the natural look of the mouth.
  • A common problem with drawing a mouth is misalignment with other parts of the face such as the nose and eyes. To avoid this problem, first draw the lines on the face structure to make segments of the face and mark the positions of different parts on the face. Draw the mouth on both sides of the middle vertical line. In case you are drawing the face from its side view, draw half of the mouth under the nose. Once you get the alignment right, you can draw different expressions with curves of the lips.
  • For a normal mouth, draw the top lip horizontally a little longer than the lower lip and the lower lip thicker in the middle portion than the top lip. Draw the top lip with a small indentation in the middle and the lines slanted towards both ends. The lower lip is more protruded in the middle and extended towards both directions ending a little before the bottom edge of the top lip. Define the edges of both lips by drawing another horizontal line going in between the other two lines. Draw vertical lines on the lip to give it a realistic look. Remember that the vertical lines of the top lip should be drawn upward from the midline of the lip, while the lines for the lower lip should be drawn downwards.
  • While drawing a mouth with a smile or laugh, determine exactly what kind of smile or laugh u want to create with the mouth. A simple lip structure spreading towards both ends can show a decent smile. If you want to draw the mouth with teeth to display laugh, draw the lips with space in between them. In this case, you have to draw the lips separately with the ends connected on both sides at the corner of the mouth. Draw the teeth and shadow them at the edges to highlight their appearance. In case you want to draw a mouth wide open you can consider drawing the tongue.
  • You can also express sorrow in a face with the curves of the mouth. While drawing the lips make the lips curved slightly downwards.
Mouth colorized

Tip:

  • Though there are several factors of drawing a face that work together to express a feeling, the expression is incomplete without the proper articulation of the mouth part. Though the above tips are useful to create a basic expression of the face through drawing the mouth, you can add your creativity to the basic ideas and draw a mouth that exactly fits the requirements.
Share Button